MAP Plugin Creator Wizard
Note
MAP is currently under active development, and this document will be updated to reflect any changes to the software or new features that are added. You can follow the development of MAP at the launchpad project.
The plugin lies at the heart of the MAP framework and the Plugin Creator Wizard creates skeleton plugins conforming to the MAP framework plugin interface. The Plugin Creator Wizard assists with the initial plugin creation allowing the plugin developer to concentrate on implementing the plugins task. For basic familiararity with the MAP Client please read the feature demonstration document MAP Features Demonstration.
For more detailed information on the plugin interface read the MAP Plugins document, this document defines the plugin interface that the new plugin must adhere to.
The Plugin Creator Wizard takes the user through a series of pages/dialogs that user fills out as suits their needs. The pages and a description about the elements in each page is given below. To move from one page to the next use the ‘next’ button at the bottom of the page, for some pages the ‘next’ button is only available once the page is complete. If the ‘next’ button is not available for a page it will be because at least one of the pages required fields is incomplete. Required fields that are incomplete will be marked with a small cross icon ( ). Once all the required fields are complete the ‘next’ button will become available, or the ‘finish’ button in the case of the last page/dialog.
Introduction Page
The introduction page contains a short welcome message and a paragraph on the Plugin Creator Wizards purpose.
Figure: The introduction page.
Identification Page
The identification page sets the name for the Workflow step, the Python package name and optionally the step icon. The Workflow step name can be set in the text box (1). As a recommendation Workflow step names should be defined in camel case as this name will be given to a class, spaces between words are acceptable however. The Workflow step name is visible in the Step box when active in the application so a descriptive name will aide users. The ‘cross’ icon (6) indicates that the entry for the step name is not valid. When a valid step name has been entered in the text box the ‘cross’ icon will be removed. Examples of valid step names are: ‘Image Source’, ‘Point Cloud Serializer’ and ‘Segmentation’.
The package name for the step will be automatically derived from the step name and set into the package name text box (2). The wizard will make changes so that the package name conforms to the PEP8 guidelines for Python. The wizard will also append the text ‘step’ to the package name. However if the default name is unsatisfactory the package name can be edited directly and given an alternative name. The matching package names for the examples given above would be: ‘imagesourcestep’, ‘pointcloudserializerstep’ and ‘segementationstep’.
An icon may be specified using the icon text box (3), the icon file may be chosen from the file system using the file chooser button (4). When an icon is specified it will be copied into the created skeleton step and be made available as a Qt resource. The suggested size of the icon is that it should be around 128px by 128px.
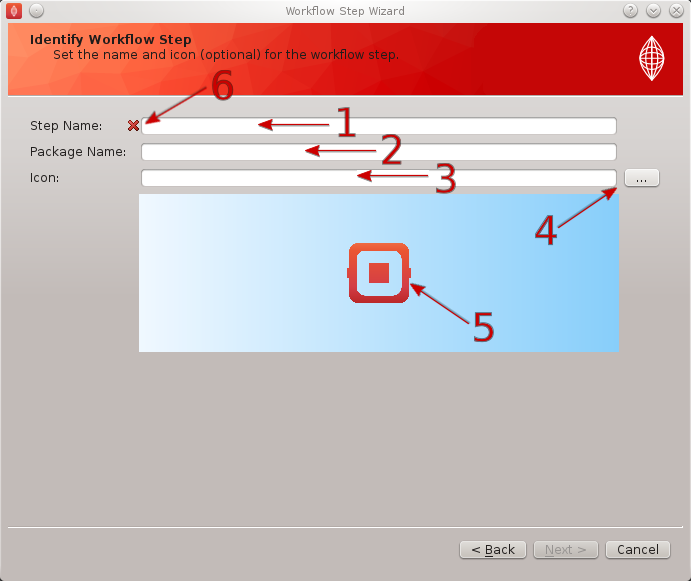
Figure: The identification page.
The step icon is an important part of the Workflow step as it is used to identify it graphically on the Workflow canvas. The default icon displays the step name across the icon to help differentiate it from other steps with no icon specified. A preview of the step icon (5) is shown so that you can see how it will look in the application.
Note
The PySide resource compiler application ‘pyside-rcc’ is required when choosing an icon image from the file system
Note
When a ‘cross’ icon appears on any page of the wizard it is used to indicate that the current field is not valid. When a field on a page is not valid the wizard cannot be progressed or finished. Therefore the ‘cross’ icon also indicates which fields require modification before the wizard can be continued.
Ports Page
The ports page sets up the ports for the step. To add a port use the ‘Add’ button (1). This will create an entry in the port list (2) with a default type of ‘provides’ and an empty object. A port can either provide or use a given object. The object should be uniquely identified using a namespace prefix, for example ‘http://my.example.org/1.0/workflowstep’.
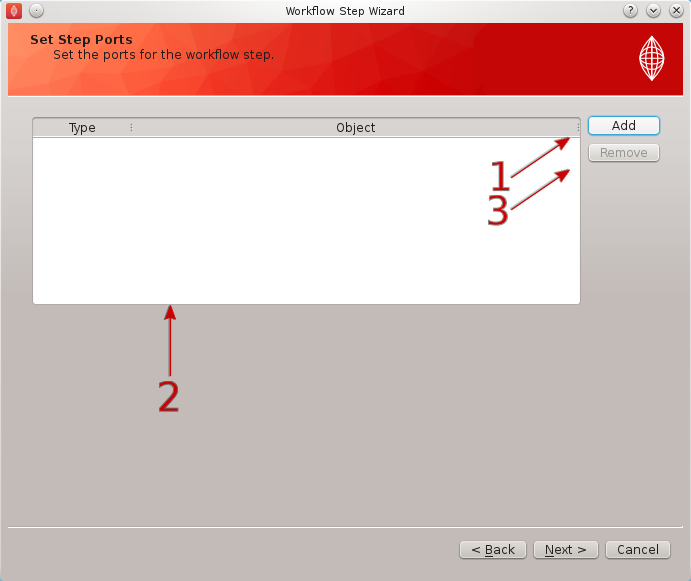
Figure: The ports page.
To remove a port, select an entry in the port list (2) and click the ‘Remove’ button (3).
For one port to be connected to any other the objects of both ports must match. The match is a determination of object compatibility (currently this is just a simple string matching test). Additionally to this one port must be the provider and the other the user (the order that the connection is made in when using the MAP Client is important). In summary the second port must use the object that the first port provides.
Example
As an example imagine that I wish to define a port that uses images. The images object that my step uses is particular class that I have defined. To create my port I would add a port using the ‘Add’ button [plugin wizard ports (1)]. Then select the ‘uses’ type from the drop down combo box in the type column.

Figure: Select the type of port using the drop down combo box.
Because my images class is of my own design I give it a unique name by prefixing it with a namespace. The namespace I use is ‘http://my.example.org/1.0/workflowstep’. So to finish defining my port for using images, in the object column I enter the following text ‘http://my.example.org/1.0/workflowstep#images’. The finished port definition should look like this.

Figure: An example port definition for using a users proprietary images object.
Configuration Page
The configuration page can help setup the configuration dialog for the step. The ‘Identifier’ check box (1) will add standard code to the step to set up the getIdentifier/setIdentifier methods in the step, it will also add an entry to the ‘ConfigurationDialog’ and validate the identifier. It is highly recommended that the ‘Identifier’ check box is checked. Use the ‘Add’ button (2) to add a configuration parameter to the configuration list (3). The configuration list has a ‘Label’ column (4), the value entered here will become a label on the configuration dialog. The ‘Default Value’ column (5) will be used to set the default value for the corresponding label. Edit the values in this list as appropriate. The ‘Remove’ button (6) can be used to delete the selected rows. The configuration parameters entered will be used in generating a configuration dialog.
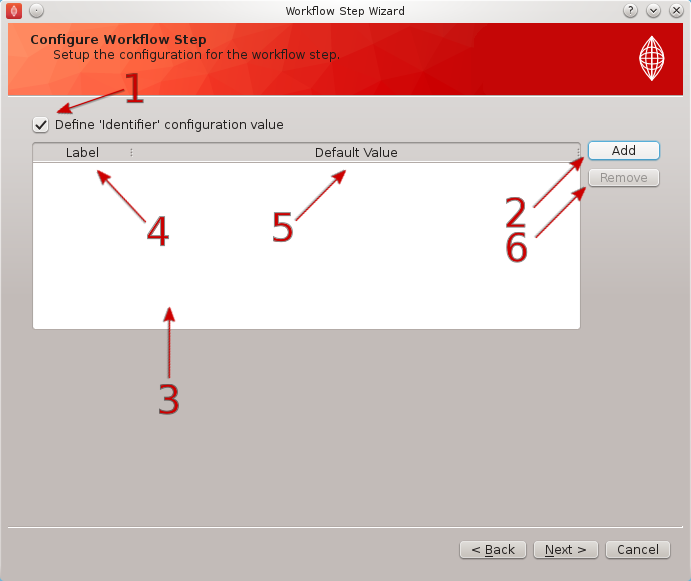
Figure: The configuration page.
Note
The PySide ui compiler application ‘pyside-uic’ is required when using the wizard to generate a step which has at least one configuration parameter.
Miscellaneous Page
The miscellaneous page sets a number of properties that are not important to the function of the step. The author name(s) for the step can be set in the text box (1). The author’s name appears when the step plugin is loaded and is not seen or used anywhere else. The category for the step can be set in the text box (2). The category determines the group that the step appears in in the Step Box of the application. We encourage plugin developers to make their plugins available to download from an online repository (eg. GitHub or Bitbucket) to promote resource sharing and improve the time and ease with which new workflows can be created. The download link for the plugin from an online repository can be set in the text box (3). This must link to a .zip file download and it is highly recommended that this be provided during plugin creation to allow workflows and their required plugins to be shared easily.
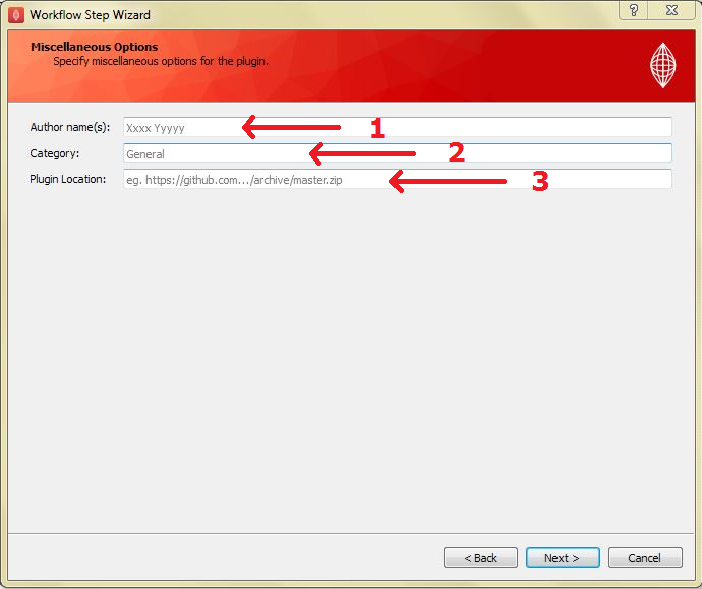
Figure: The miscellaneous page.
Output Page
The output page sets the directory where the skeleton step will be generated. The output directory can be set in the text box (1), or selected from the file system using the directory chooser button (2). The ‘cross’ icon (3) indicates that the current directory entry is not a directory that can be written into. The output directory specified in (1) must be an existing directory that you have the ability/permission to write to before the wizard can be successfully finished.
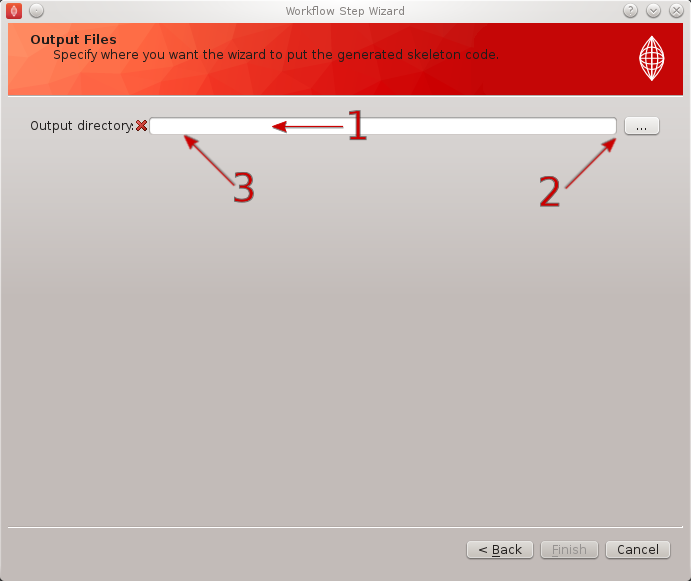
Figure: The output page.
Generation
When the wizard has been completed, the skeleton step will be generated in the chosen directory. To load the skeleton step use the Plugin Manager to add the chosen directory into the list of plugin directories or use the Reload button if the new skeleton step is in an existing plugin directory.